In this lesson, you’ll learn how to do the following:
- Draw a perspective grid
- Convert drawings to guides
- Make objects seem to recede in the background
- Uniformly scale objects for perspective effect
- Blend objects
Design 10C
Produce a monochromatic palette of at least 11 steps and use it to design a pictorial scene. Your image may be an interior or exterior scene and may describe objects of any size. It must, however, create a 3 dimensional illusion.
See the hand out from the previous assignment for information on creating a monochromatic palette.
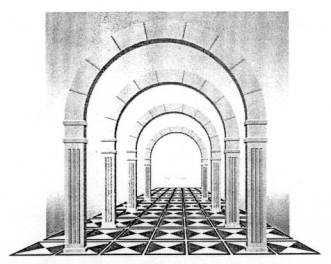
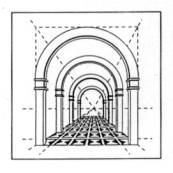
See the Drawing in Perspective handout for a quick primer on using Illustrator to make objects appear to recede in space. This example is adapted from the Classroom in a Book series for Illustrator 7, but it’s instructions for using the blend and scale tools are still applicable. It is provided to allow you to see how the tools work. Creating its arches and tile walkway is not the assignment.
Beginning with Illustrator 8, you can also use the free transform tool (with additional keys) to create perspective illusions for planes or surfaces. A description of this method follows the Drawing in Perspective text, and I will demonstrate it for you in class.
You should also review the techniques in the Gradient Ball / Shadow tutorial.
Please remember that you are responsible for creating a strong graphic image as well as a three dimensional illusion. You must pay as much attention to the light and dark values in your monochrome design, and the positive and negative special relationships on your page, as you do to the 3 dimensional illusion.
|
In this lesson, you’ll learn how to do the following:
|
|
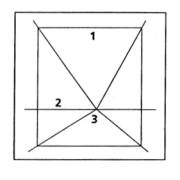
Start by drawing a perspective grid. You will use this grid as a template to create the artwork and align objects horizontally and vertically.
Using the pen tool, draw a simple perspective grid with one-point stroked lines. Include a picture plane (1), horizon line (2), and a vanishing point (3).
You can also use existing artwork as a guide. To turn the artwork into guides, select it and chose View > Make Guides. You can then draw your artwork on top of the guides.
Using the selection tool, Shift-click to select the lines. Choose View > Make Guides to convert them to guides. For easy alignment, select the Snap to Point option so that the pointer will “snap” to the guides. (View > Snap to Point)
Now use the drawing tools to create the foreground objects.

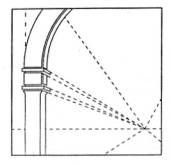
You can create additional guides as needed. For
example, you can create guides for aligning detail on the column sides. Start
from the vanishing point, and draw lines that intersect the corresponding
(matching) points on the face of the column. Select the lines and choose Make
Guides from the View menu. Using these guides and their angle as a reference,
draw the column sides in perspective.
When you’ve drawn all the foreground objects,
select them and choose Object > Group. Grouping objects lets you select and
edit them as a unit.
Making Objects Recede
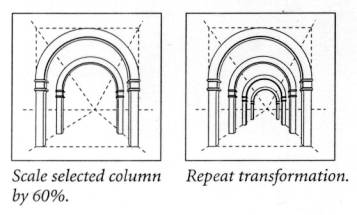
To make objects recede to the background, you will use the scale tool.
Scaling an object enlarges or reduces it horizontally (along the x axis) or vertically (along the y axis), or both horizontally and vertically, relative to the point of origin you designate. (The point of origin is the fixed point on, or around, the object from which the scaling occurs.)
Select the column (including any detail you have added). Click the Scale tool in the tool box. Alt-click (Option-click / Mac) the vanishing point of the drawings.
You can scale by dragging, or using the scale dialog
box. Alt-clicking with the scale tool displays the Scale dialog box so that you
can precisely scale an object. (You can also scale precisely using the menu
command; cho0se Object > Transform > Scale.) Unless you click elsewhere,
the default point of origin is the object’s center point.
In the scale dialog box, click Uniform. The uniform option maintains the proportion of the original selection when scaling. Enter a percentage. (We used 60%.) Select the Scale Stroke Weight option. When you scale stroke weights, the line size of all the stroked paths (as specified in the Stroke palette) are scaled along with the objects. Click Copy to make the selection seem to recede into the background.
Choose Object > Transform > Transform Again to repeat the scale and copy operation until you have created the effect you want. The shortcut for repeating a transformation such as scaling is Ctrl+D (Command+D/Mac)
Blending objects to make them recede
Another way to make objects recede into the background is to use the blend tool.
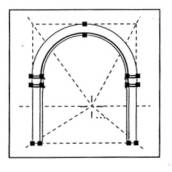
Now you will create rows of evenly spaced floor tiles. Start by drawing additional lines to act as guides for the tiles.
Using the pen tool, draw two additional lines that intersect at the vanishing point. Then draw a horizontal line above the bottom of the picture plane.
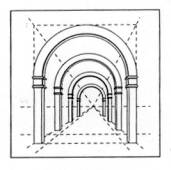
Using the selection tool, shift click the lines you
just drew. Choose View > Make Guides to convert them to guides. Now use the
pen tool to draw the front left and right floor tiles in the areas defined by
the guides.
To make the two tiles blend evenly, they must have the same number of anchor points, and they should have the same width. If necessary, rearrange your guides by choosing View > Lock Guides to unlock them (no checkmark should appear), and then adjust them using the direct selection tool. Then choose View > Lock Guides to check the command and lock guides again. You can also release the guides (choose View > Release Guides), edit them as artwork, and then return them into guides again (Choose View > Make Guides).
Before blending the tiles, you’ll paint them.
Select the two tiles you just drew. Click the Fill box in the toolbox. Then select a color by either using the controls in the Color palette or by clicking a swatch in the Swatches palette.
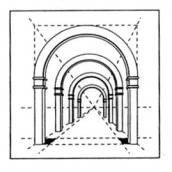
With the two tiles still selected, click the Blend tool in the toolbox. The Blend tool creates a series of intermediate objects between the two selected anchor points. You can also blend between colors.
Click the corresponding point on each tile (for example the upper left point on each tile). If you don’t click the corresponding point on both tiles, the shapes won’t blend evenly.
From the Object Menu chose Blends > Blend Options. Choose Specified Steps for spacing and enter the number of tiles you want to create between the selected tiles. Then click OK to blend the tiles.
If you are dissatisfied with the number of blended
objects that results, choose Edit > Undo Blend Shapes. Then repeat the
procedure with other values.
Blending objects on top
of objects
To complete the artwork, you
will make the foreground objects more detailed by adding layered shapes to the
objects and using the Blend tool again.
Draw triangles on the original
left and right tiles, and fill them white. Now select the two top triangles.
Select the Blend tool and click the corresponding points on both tiles. Open the
Blend dialog box and choose specified steps. Then enter the number of tiles you
created in the previous section and click OK.
The Blend tool lets you blend
only two selected objects at one time. You can not blend between groups of
objects. However, you can use the direct selection tool to select the components
of groups and blend between the components. You can also blend between two
patterned objects if they are filled with the same pattern.
Now you will complete the
design on the tile.
Select the bottom left and
right triangles. Repeat the procedure you just used to blend these objects as
well.
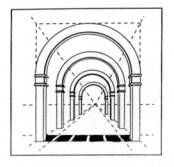
Next you will group the tiles to apply changes to them as a unit. Select all the tiles and triangles and choose Object > Group to group them.
To complete the flooring, you will use the Scale tool again to create receding objects. Select the group of tiles. Use the Scale tool and Alt-click (Option-click/Mac) the vanishing point in the artwork. In the Scale dialog box enter a uniform scale percentage (use the same one you picked earlier) and select the Scale Stroke option. Click Copy to create additional receding tiles. Press Ctrl+D to repeat the copy command and create as many additional rows of tile as you want.
(You can also choose to scale line weights
automatically by selecting the Scale Strokes option from the General Preferences
dialog box.)
Perspective with the Free
Transform tool
Beginning with Illustrator 8,
you can use the Free Transform tool to put any surface into perspective. I will
use a floor as an example but the principle works equally well for walls, rows
of trees, etc..
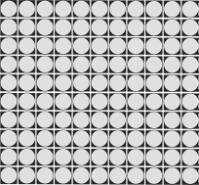
First, draw your floor square from a top view, as if you were drawing a plan. I used a simple combination of squares and circles, but you can create far more elaborate surfaces, as long as they are made of filled shapes and lines.
 |
Select the entire floor image, and then choose the Free Transform tool. Click on one of the upper corner anchors in the bounding box, holding down the mouse button, and begin to move the corner upward. Without letting up on the mouse button, push and hold Shift+Alt+Ctrl (Shift+Opt+Com/Mac) and move the mouse toward the center of the top line. Illustrator will distort everything toward this new shortened top line.
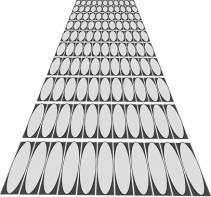 |
Make sure this entire new image is selected and then switch to the Selection tool. Grab the anchor point in the middle of the top line of the bounding box, and move it down until the illusion matches your perspective needs.
This example works for a centralized vanishing point, but you can adjust it to fit situations where the vanishing point is left or right of center. Select the entire image and choose the Free Transform tool. Click on the top center anchor in the bounding box, holding down the mouse button, and begin to move the corner upward. . Without letting up on the mouse button, push and hold Alt+Ctrl (Opt+Com/Mac) and move the mouse to the left or right. The perspective will shift as you do.